AWS IoT Device Shadowを使ってみた!(Part4)
本記事は、最終目標である遠隔からDevice Shadow機能を使ってIoT Device制御をまとめたものです。 なお、4つの記事の中で今回は 下記の「 Part4 」です
主な全体記事の流れです。
■ Part1 : API Gatewayから起動するLambda関数の作成
■ Part3 : AWS IoT Deviceとshadow作成
■ Part4 : iPhoneアプリ作成 と 遠隔Camera起動確認
- 注意
- AWS構成図
- Appプロジェクト環境
- Alamofireインストール
- アプリソースコード
- App起動
- App → IoT Core Shadow 動作
- IoT Device shadow起動とiOS App制御
- 最後に
iPhoneアプリも初心者で......。
プロジェクトの作り方や、viewイメージで作成したボタンをソースコード接続や、ボタンをタップしたメソッド生成方法..... などは割愛します。
注意
2020/12/17からboto3でIoT CoreのDevice ShadowにアクセスするとSSLエラーが発生する事象が出ています。
AWSのcertifiライブラリが「2020.12.5」にバージョンアップされたことが原因らしく、下記サイトを参考に応急処置を行い、問題なく動作できることを確認しました。
その時のエラーメッセージです。
{"errorMessage": "SSL validation failed for https://data.iot.ap-northeast-1.amazonaws.com/things/RaspberryPi_Camera/shadow [SSL: CERTIFICATE_VERIFY_FAILED] certificate verify failed: unable to get local issuer certificate
応急処置方法のサイトをリンク貼り付けます。
certifiライブラリ「2020.11.8」版をMACで作成し、その「 layer.zip 」ファイルをAWS Lambdaコンソールから「 レイヤー追加 」、対象となるLambda関数に適用でいけました。
正式にはIoT CoreのATSエンドポイント指定することで対応可能なようです。 すみません。自分は確認していません。ご了承ください。
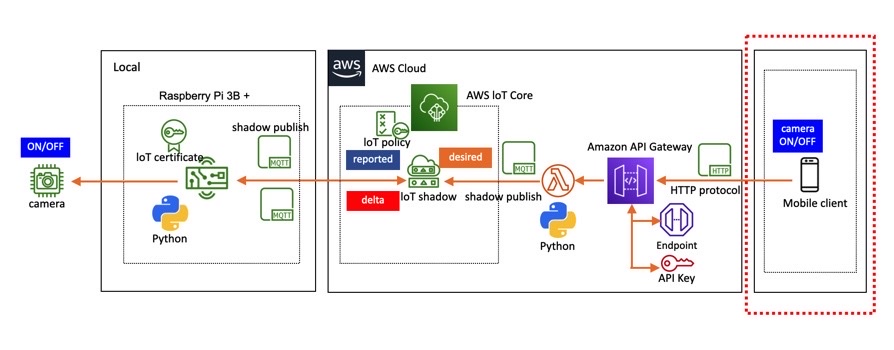
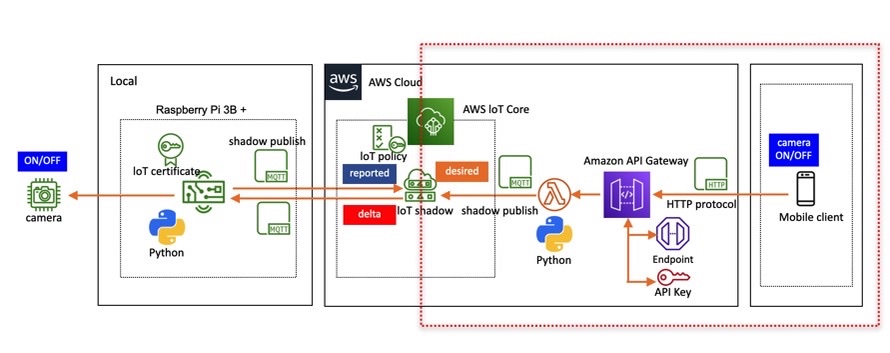
AWS構成図
赤点線で囲んだ箇所を今回作成します。
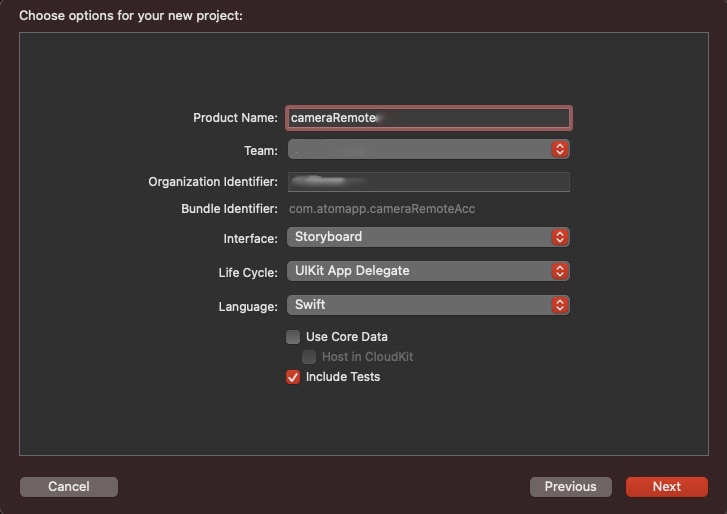
Appプロジェクト環境
使用するinterfaceは「 Storyboard 」、言語(Language)は「 Swift 」を使用します。
Alamofireインストール
Alamofireとは
AlamofireはiOSアプリでネットワーク通信(HTTP、REST APIなど)を簡単に使うことができるライブラリです。ネイティブのネットワーク通信のライブラリを使用するより簡単に実装ができるようです。
アプリ作成初心者にはおすすめらしいので「 Alamofire 」を使用します。
インストール
いろいろなサイトでインストール方法が掲載されていますが、一番簡単な方法でやります。
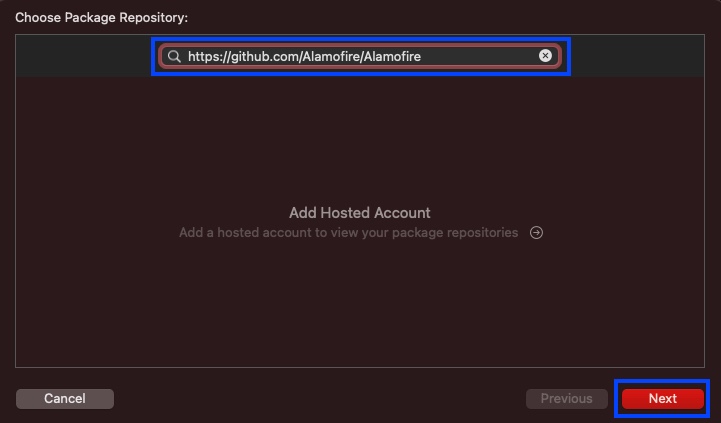
Xcodeの「 File 」 -> 「 Swift Packages 」 -> 「 Add Package Dependency.... 」を選択します。

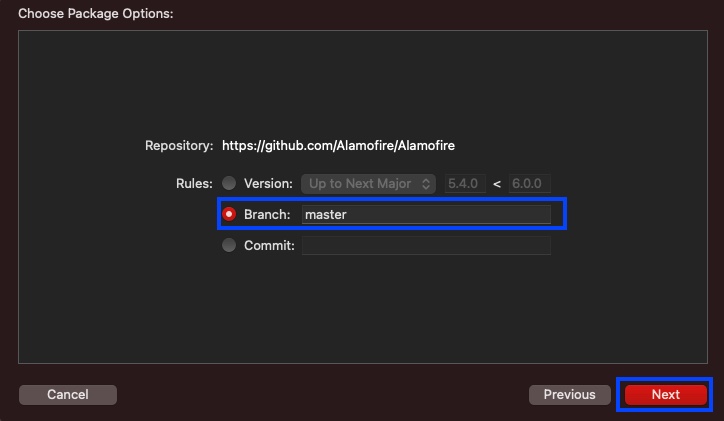
Alamofireのgitリポジトリアドレスを入力 「 https://github.com/Alamofire/Alamofire 」を入力し、「 Next 」ボタンをクリックします。
「 Branch 」のラジオボタンで選択し、「 Next 」ボタンをクリックします。
Alamofireのチェックボックスにチェックを入れて、「 Next 」ボタンをクリックします。
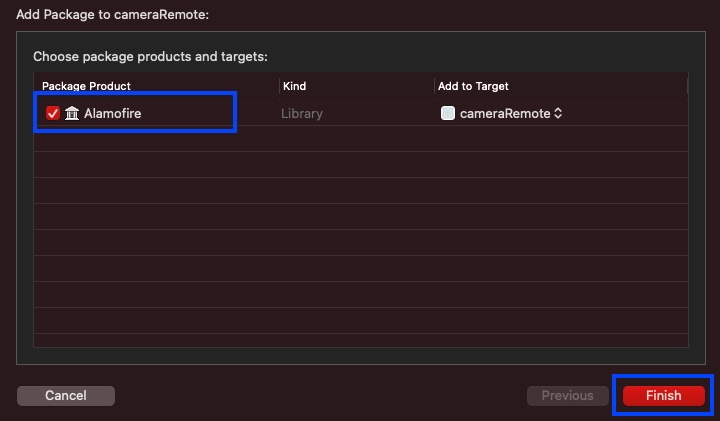
Alamofireが表示されている状態を確認します。
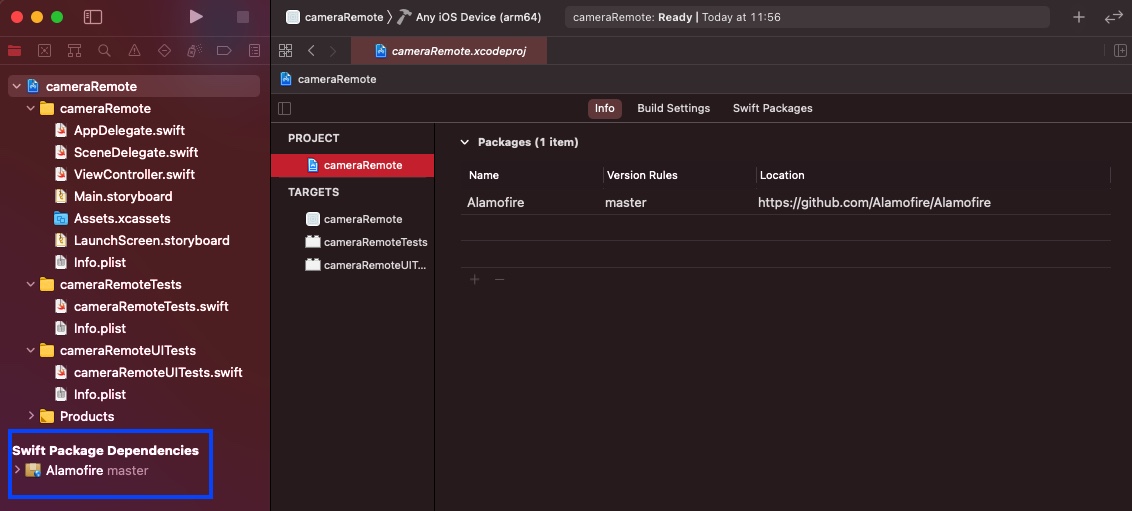
これでAlamofireがインストールできました。
アプリソースコード
冒頭でも説明しましたが、viewイメージで作成したボタンをソースコード接続や、ボタンをタップなどのメソッド生成方法の図解は割愛します。
Main.storyboardファイルにボタン、テキストをGUI上で配置しておいてください。
ソースファイルのコピペだけではエラーとなりますので、ご注意ください。
ViewController.swift
単純な「ON」と「OFF」ボタンを配置し、タップ動作を入れているだけのシンプル? な初心者作成ソースコードです。
import UIKit
import Alamofire

class ViewController: UIViewController {

    @IBOutlet weak var buttonON: UIButton!
    @IBOutlet weak var buttonOff: UIButton!

    //  AWS API Gateywayで設定し生成されたCamera ONのPOST URL
    //  ■ xxxxxxxxxxxは各自の環境に合わせてください。
    var awsApiGatewayURLOn = "https://xxxxxxxxxx.execute-api.xxxxxxxxxxxxxxx.amazonaws.com/development/test?camera=1"
    //  AWS API Gateywayで設定し生成されたCamera OFF POST URL
    //  ■ xxxxxxxxxxxは各自の環境に合わせてください。
    var awsApiGatewayURLOff =
        "https://xxxxxxxxxxxxx.execute-api.ap-xxxxxxxxxxxx.amazonaws.com/development/test?camera=0"
    //  AWS API Gateywayで生成したAPIキー
    //  ■ xxxxxxxxxxxは各自の環境に合わせてください。
    var awsApiKey = "xxxxxxxxxxxxxxxxxxxxxxxxxxxxxxxx"

    override func viewDidLoad() {
        super.viewDidLoad()

    }

    override func viewDidAppear(_ animated: Bool) {
       //  ボタンONの形を変える
        buttonON.frame = CGRect(x:25,y:131,width:330,height:150)
        buttonON.layer.masksToBounds = false
        buttonON.layer.cornerRadius = 10.0
        // ボタンの影
        buttonON.layer.shadowOffset = CGSize(width: 3, height: 3)// 影の方向
        buttonON.layer.shadowOpacity = 0.4 // 影の濃さ
        buttonON.layer.shadowRadius = 7 // 影のぼかし量

        //  ボタンOFFの形を変える
        buttonOff.frame = CGRect(x:25,y:300,width:330,height:150)
        buttonOff.layer.masksToBounds = false
        buttonOff.layer.cornerRadius = 10.0

        // ボタンの影
        buttonOff.layer.shadowOffset = CGSize(width: 3, height: 3)
        buttonOff.layer.shadowOpacity = 0.4
        buttonOff.layer.shadowRadius = 7
    }

    // ONボタンを押した状態の時に起動
    @IBAction func buttonON_touchdown(_ sender: UIButton) {

        // 色をsystemGray3に変える
        buttonON.backgroundColor = UIColor.systemGray3
    }

    // OFFボタンを押して離した時に起動
    @IBAction func buttonON_touchUp(_ sender: UIButton) {
        // 色をsystemYellowに変える
        buttonON.backgroundColor = UIColor.systemYellow

        // AWS Gatewayアクセス CameraON URL
        AF.request(awsApiGatewayURLOn,method: .post,headers: ["X-API-KEY":awsApiKey]).response { response in debugPrint(response)}
    }

    // OFFボタンを押した状態の時に起動
    @IBAction func buttonOFF_touchdown(_ sender: UIButton) {
        // 色をsystemGray3に変える
        buttonOff.backgroundColor = UIColor.systemGray3

    }

    // OFFボタンを押して離した時に起動
    @IBAction func buttonOFF_touchUp(_ sender: UIButton) {
        // 色をsystemTealに変える
        buttonOff.backgroundColor = UIColor.systemTeal

        // AWS Gatewayアクセス CameraOFF URL
        AF.request(awsApiGatewayURLOff,method: .post,headers: ["X-API-KEY":awsApiKey]).response { response in debugPrint(response)}

    }
}
App起動
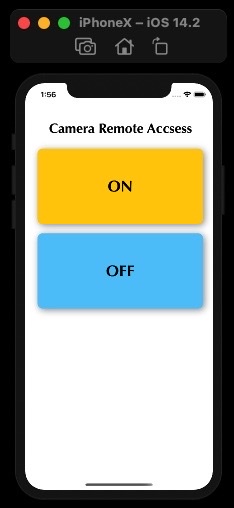
Xcodeでビルドし、起動するとON/OFFの2つのボタンを表示します。
下記イメージはMAC上で表示したSimulatorです。
実際に動作させるときは、iphoneにAppを転送しています。
AWS設定やIoT Deviceソースコード、Lambda関数ソースコード、iOS Appソースコードの説明は以上です。
これでiPhoneからIoT Deviceに接続しているカメラを起動する準備ができました。
それでは実際に試してみます。
App → IoT Core Shadow 動作
Appから「 ON 」ボタンを押してIoT CoreのShadowテーブルが更新することを確認します。 イメージは赤点線で囲んだ箇所のルートです。
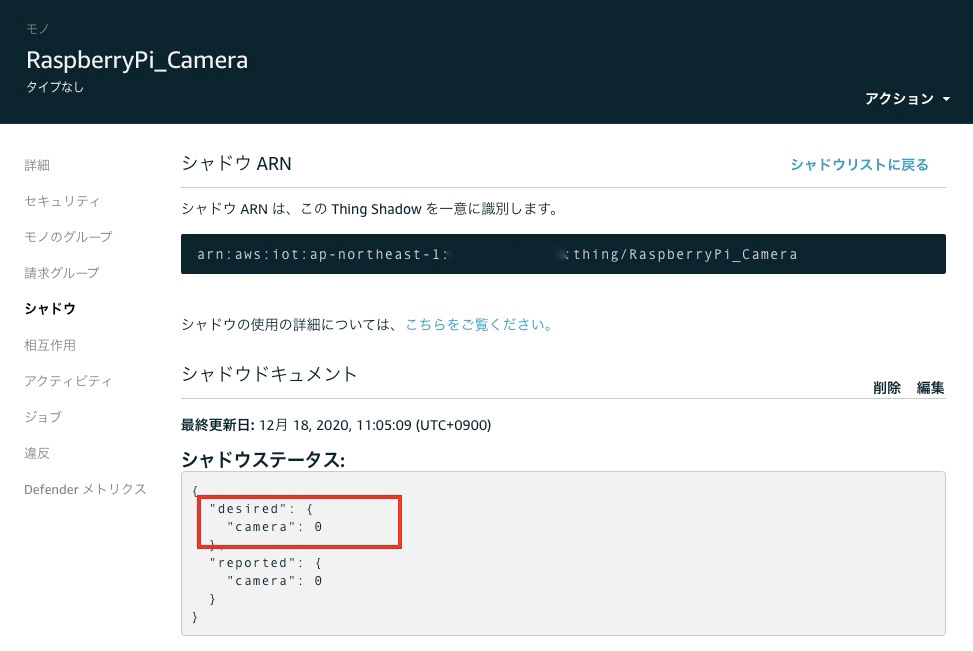
IoT CoreのShadowの状態確認
IoT Coreコンソールにアクセスします。
コンソール画面の「 管理 」-> 「 モノ」-> 「 RaspberryPi_Camera 」-> 「 シャドウ 」-> 「 classic shadow 」をクリックします。
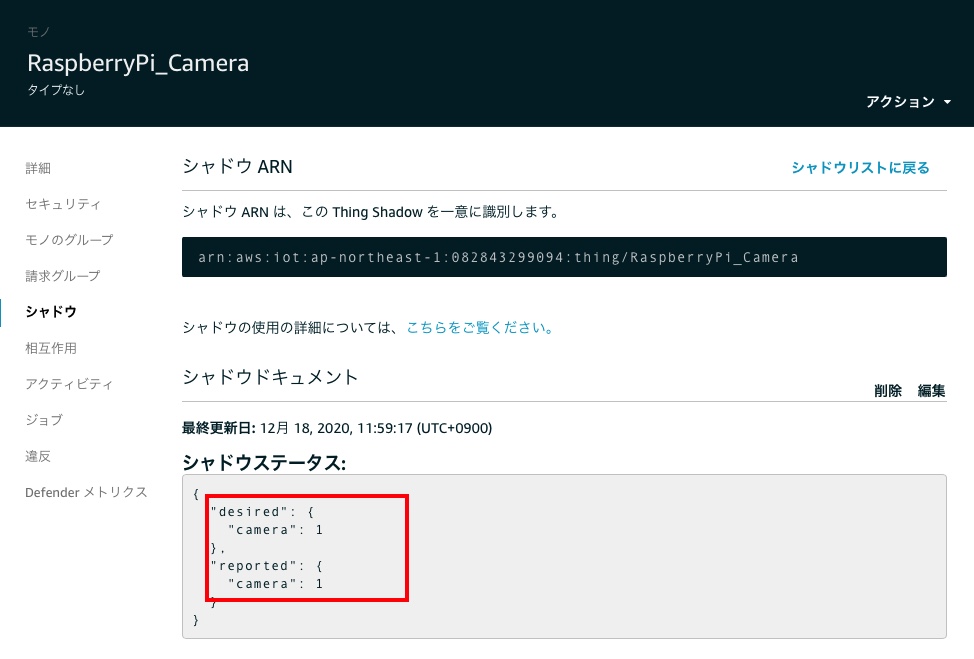
"camera" : "0"はカメラ停止 、 "camera" : "1"はカメラ起動 です。
Shadow状態確認
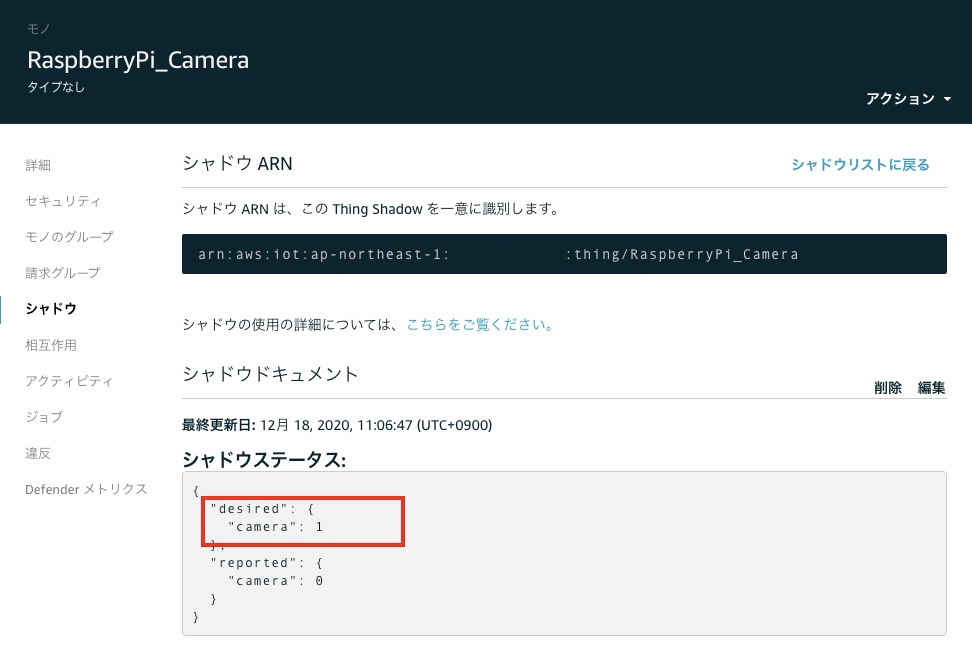
iOS Appから「 ON 」ボタンをクリックします。
Appから送信された「 camera=1 」のREST APIが、最終的にIoT Core Shadowに到達し、「 desired 」の「 "camera" : "1" 」に変化したことが確認できます。
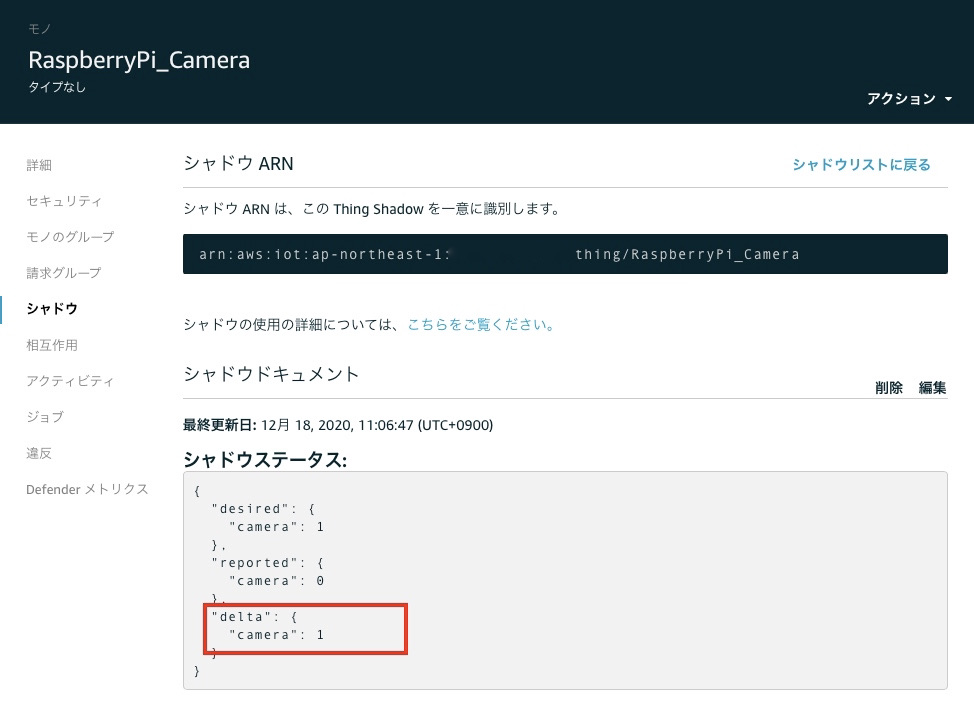
更に「 desired 」と「 reported 」のcamera変数の値が異なることをAWS shadowが検出し、「 delta 」で値をステータスとして表示しています。
このステータスの確認は、一回ブラウザの更新ボタンで画面更新で表示されます。
次にiOS Appからの指示とIoT Deviceの連携を一連の動作で見たいので、一旦OFFボタンをタップして、「 desired 」の「 "camera" : "0" 」にします。
REST API制御
iOS Appを使用しなくても、直接REST APIを呼び出して制御することもできます。
x-api-key、httpsアドレスの 「xxxxxxxxxxxxxxxxxxxx」は各自の環境に合わせてください。
また「ap-northeast-1」.は、API Gatewayで作成したリージョン(今回は東京)です。
ON/OFFの違いは「 camera=0 」と 「 camera=1 」のみです。
Camera ONのAPI
   curl -X POST --header "x-api-key:xxxxxxxxxxxxxxxxxxxxxxxxxxxxxxxxxxxxxx" \
   https://xxxxxxxxxxxxx.execute-api.ap-northeast-1.amazonaws.com/dev/"test?camera=0"
Camera OFFのAPI
   curl -X POST --header "x-api-key:xxxxxxxxxxxxxxxxxxxxxxxxxxxxxxxxxxxxxx" \
   https://xxxxxxxxxxxxx.execute-api.ap-northeast-1.amazonaws.com/dev/"test?camera=1"
IoT Device shadow起動とiOS App制御
IoT DeviceがAWS IoT CoreにShadowにアクセスし、「 desired 」の「 "camera" : "1" 」に変化したことを検出し、「reported 」の「 "camera" : "1" 」に変化させ、更にIoT Deviceのカメラが起動していることを確認します。
赤点線部分の確認です。

Pythonスクリプト実行
IoT Device(RaspberryPi)にアクセスし、shadow起動のPythonスクリプトを起動します。
$ python3 shadow_camera_test.py
起動後、標準出力で表示ログを出力します。
下記の表示イメージは、全て「AWSIoTPythonSDK.MQTTLib」ライブラリで出力しています。
  2020-12-17 10:01:55,642 - AWSIoTPythonSDK.core.protocol.internal.clients - DEBUG - Initializing MQTT layer...
  2020-12-17 10:01:55,644 - AWSIoTPythonSDK.core.protocol.internal.clients - DEBUG - Registering internal event callbacks to MQTT layer...
  2020-12-17 10:01:55,644 - AWSIoTPythonSDK.core.protocol.mqtt_core - INFO - MqttCore initialized
  2020-12-17 10:01:55,645 - AWSIoTPythonSDK.core.protocol.mqtt_core - INFO - Client id: RaspberryPi
  2020-12-17 10:01:55,645 - AWSIoTPythonSDK.core.protocol.mqtt_core - INFO - Protocol version: MQTTv3.1.1
  2020-12-17 10:01:55,645 - AWSIoTPythonSDK.core.protocol.mqtt_core - INFO - Authentication type: TLSv1.2 certificate based Mutual Auth.
  2020-12-17 10:01:55,645 - AWSIoTPythonSDK.core.protocol.mqtt_core - INFO - Configuring offline requests queueing: max queue size: 0
  2020-12-17 10:01:55,646 - AWSIoTPythonSDK.core.protocol.mqtt_core - INFO - Configuring offline requests queue draining interval: 0.100000 sec
  2020-12-17 10:01:55,646 - AWSIoTPythonSDK.core.protocol.mqtt_core - INFO - Configuring endpoint...
  2020-12-17 10:01:55,647 - AWSIoTPythonSDK.core.protocol.mqtt_core - INFO - Configuring certificates...
  2020-12-17 10:01:55,647 - AWSIoTPythonSDK.core.protocol.mqtt_core - INFO - Configuring reconnect back off timing...
  2020-12-17 10:01:55,648 - AWSIoTPythonSDK.core.protocol.mqtt_core - INFO - Base quiet time: 1.000000 sec
  2020-12-17 10:01:55,648 - AWSIoTPythonSDK.core.protocol.mqtt_core - INFO - Max quiet time: 32.000000 sec
  2020-12-17 10:01:55,648 - AWSIoTPythonSDK.core.protocol.mqtt_core - INFO - Stable connection time: 20.000000 sec
  2020-12-17 10:01:55,649 - AWSIoTPythonSDK.core.protocol.mqtt_core - INFO - Configuring connect/disconnect time out: 10.000000 sec
  2020-12-17 10:01:55,649 - AWSIoTPythonSDK.core.protocol.mqtt_core - INFO - Configuring MQTT operation time out: 5.000000 sec
  2020-12-17 10:01:55,649 - AWSIoTPythonSDK.core.protocol.mqtt_core - INFO - Performing sync connect...
  2020-12-17 10:01:55,649 - AWSIoTPythonSDK.core.protocol.mqtt_core - INFO - Performing async connect...
  2020-12-17 10:01:55,649 - AWSIoTPythonSDK.core.protocol.mqtt_core - INFO - Keep-alive: 600.000000 sec
  2020-12-17 10:01:55,650 - AWSIoTPythonSDK.core.protocol.internal.workers - DEBUG - Event consuming thread started
  2020-12-17 10:01:55,651 - AWSIoTPythonSDK.core.protocol.mqtt_core - DEBUG - Passing in general notification callbacks to internal client...
  2020-12-17 10:01:55,651 - AWSIoTPythonSDK.core.protocol.internal.clients - DEBUG - Filling in fixed event callbacks: CONNACK,DISCONNECT,MESSAGE
  2020-12-17 10:01:55,774 - AWSIoTPythonSDK.core.protocol.internal.clients - DEBUG - Starting network I/O thread...
  2020-12-17 10:01:55,848 - AWSIoTPythonSDK.core.protocol.internal.workers - DEBUG - Produced [connack] event
  2020-12-17 10:01:55,849 - AWSIoTPythonSDK.core.protocol.internal.workers - DEBUG - Dispatching [connack] event
  2020-12-17 10:01:55,850 - AWSIoTPythonSDK.core.protocol.internal.workers - DEBUG - No need for recovery
  2020-12-17 10:01:55,851 - AWSIoTPythonSDK.core.protocol.internal.clients - DEBUG - Invoking custom event callback...
  2020-12-17 10:01:55,852 - AWSIoTPythonSDK.core.protocol.mqtt_core - INFO - Performing sync subscribe...
  2020-12-17 10:01:55,852 - AWSIoTPythonSDK.core.protocol.internal.workers - DEBUG - Adding a new subscription record:$aws/things/RaspberryPi_Camera/shadow/update/delta qos: 0
  2020-12-17 10:01:55,853 - AWSIoTPythonSDK.core.protocol.internal.clients - DEBUG - Filling in custom suback event callback...
  2020-12-17 10:01:55,907 - AWSIoTPythonSDK.core.protocol.internal.workers - DEBUG - Produced [suback] event
  2020-12-17 10:01:55,908 - AWSIoTPythonSDK.core.protocol.internal.workers - DEBUG - Dispatching [suback] event
  2020-12-17 10:01:55,908 - AWSIoTPythonSDK.core.protocol.internal.clients - DEBUG - Invoking custom event callback...
  2020-12-17 10:01:55,909 - AWSIoTPythonSDK.core.protocol.internal.clients - DEBUG - This custom event callback is for pub/sub/unsub, removing itafter invocation...
  2020-12-17 10:01:57,912 - AWSIoTPythonSDK.core.shadow.deviceShadow - INFO - Subscribed to delta topic for deviceShadow:RaspberryPi_Camera
  2020-12-17 10:02:01,042 - AWSIoTPythonSDK.core.protocol.internal.workers - DEBUG - Produced [message] event
  2020-12-17 10:02:01,042 - AWSIoTPythonSDK.core.protocol.internal.workers - DEBUG - Dispatching [message] eventdelta/RaspberryPi_Camera
ASW IoT Coreコンソールからshadow状態の確認します。
まだカメラ停止状態です。

iOS Appから「 ON 」ボタンをタップすると、「 desired 」の「 "camera" : "1" 」に変化したことを検出し、「reported 」の「 "camera" : "1" 」になりました。
Iot Device(RaspberryPi)のshadow変化検出ログイメージです。
  ++++++++DELTA++++++++++
  camera: 1
  version: 12
  +++++++++++++++++++++++

  updating...
最後にカメラが起動した時の画像です。
時間がIoT Core コンソールのShadowステータスと異なりますが、ご了承ください。

最後に
途中AWSアップデートで動作しない時もありましたが、目標としているAWS Iot Device Shadow機能を使って遠隔操作を確認することができました。
この方法は見守りカメラなどでも使用されているようですね。ご参考にしていただければと思います。