AWS IoT Device Shadowを使ってみた!(Part3)
本記事は、最終目標である遠隔からDevice Shadow機能を使ってIoT Device制御をまとめたものです。 なお、4つの記事の中で今回は 下記の「 Part3 」です
主な全体記事の流れです。
■ Part1 : API Gatewayから起動するLambda関数の作成
■ Part3 : AWS IoT Deviceとshadow作成
■ Part4 : iPhoneアプリ作成 と 遠隔Camera起動確認
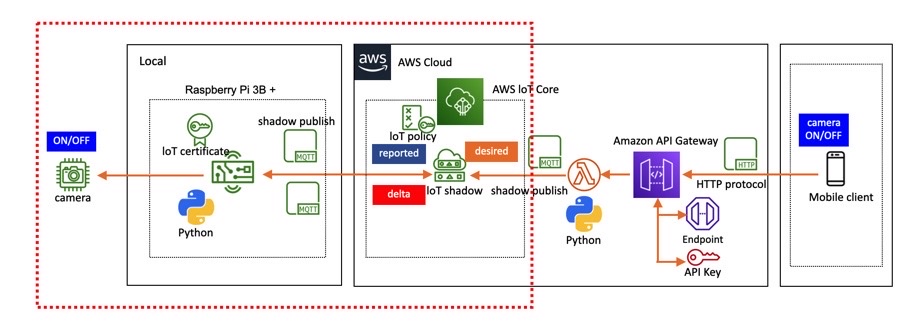
AWS構成図
赤点線で囲んだ箇所を今回作成します。
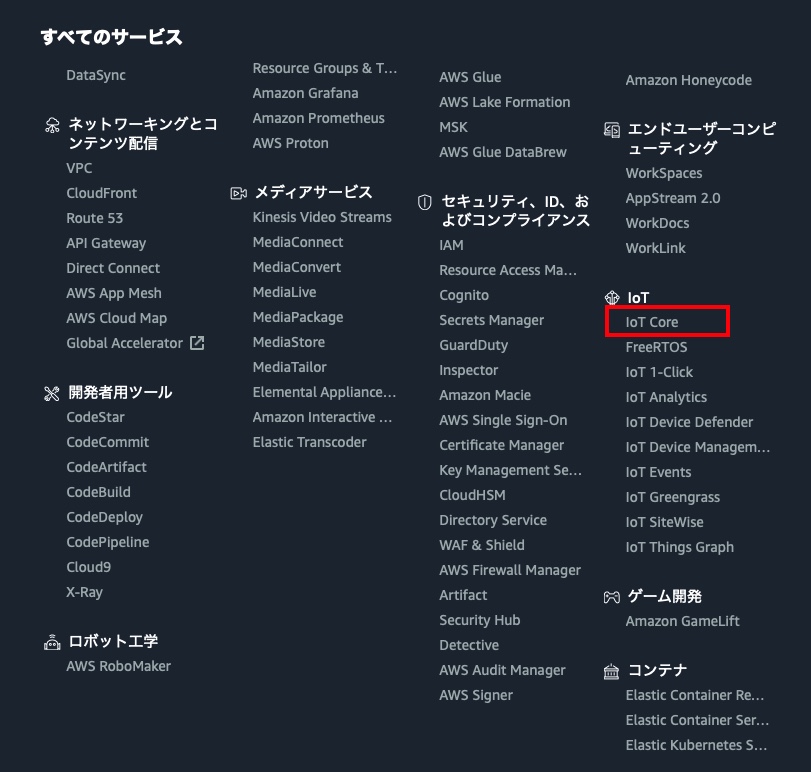
AWS IoTアクセス
AWS IoTコンソールにアクセスします。
IoTポリシーの作成
AWS IoTのコンソールの左メニュの「 安全性」-> 「 ポリシー 」をクリックします。
ポリシー登録画面に遷移し、ポリシーを登録します。「作成 」ボタンをクリックし、ポリシーの作成画面に遷移します。
「 名前 」、「 アクション」、「リソースARN」、「 効果 ]を入力&選択します。今回は名前は「 RaspberryPi_Camera-Policy 」にしています。

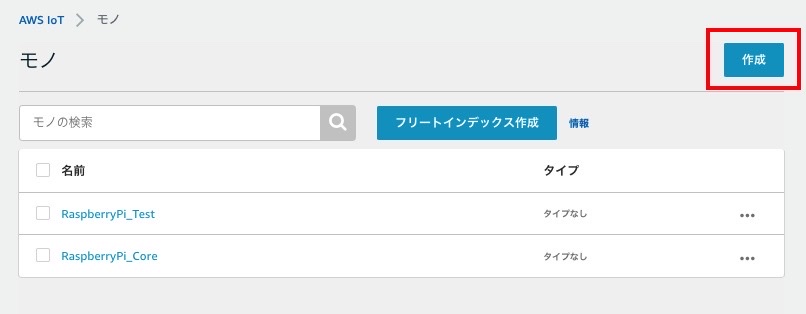
モノの作成
AWS IoTのコンソールの左メニュの「 管理 」-> 「 モノ 」をクリックします。
モノの登録画面遷移し、IoT Deviceを登録します。「 作成ボタン 」をクリックします。
単一のAWS IoTモノを作成します。「 単一のモノを作成する 」ボタンをクリックします。

「 名前 」、「 Thing Shadow 」を入力します。今回はIoT Deviceは「Raspberry Pi」を使用するため「RaspberryPi_Camera」としています。
「Thing Shadow」はすでに設定内容が 「 "Welcome...... "」となっていますが、下記のように書き換えます。
最後に「 次へ 」ボタンをクリックします。
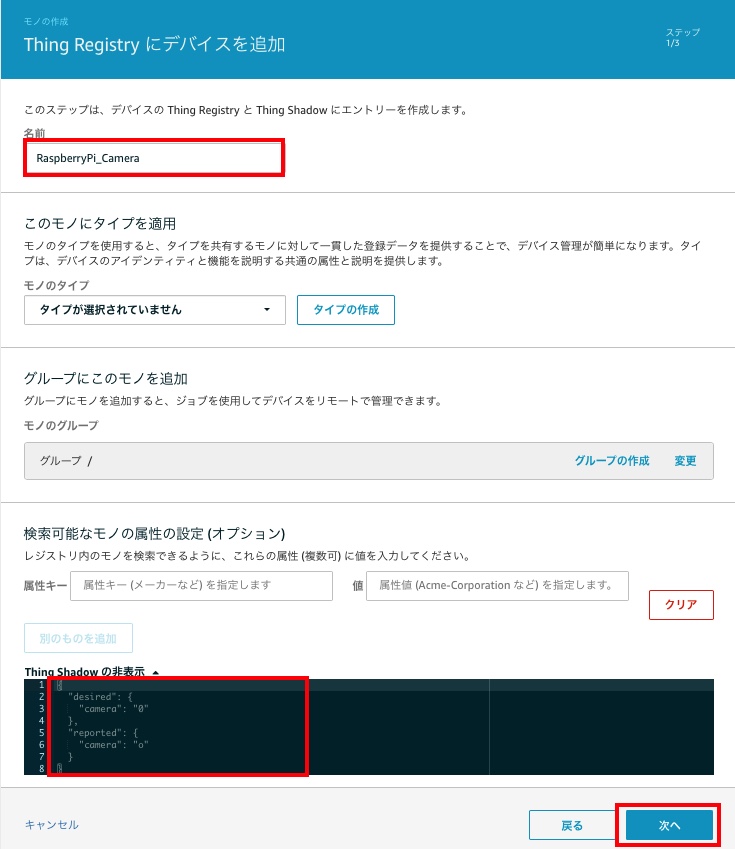
画像が見えないので「Thing Shadow」は下記をご参考にしてください。
 {
     "desired": {
         "camera": "0"
      },
      "reported": {
         "camera": "0"
 },
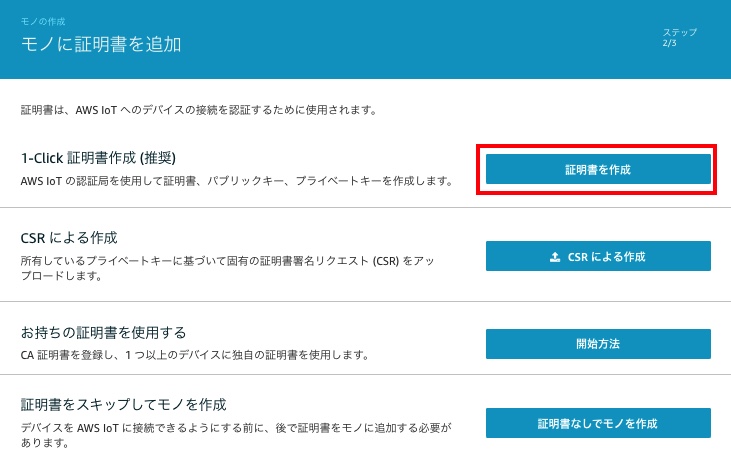
証明書を作成します。「 __ 証明書を作成」ボタンをクリックします。
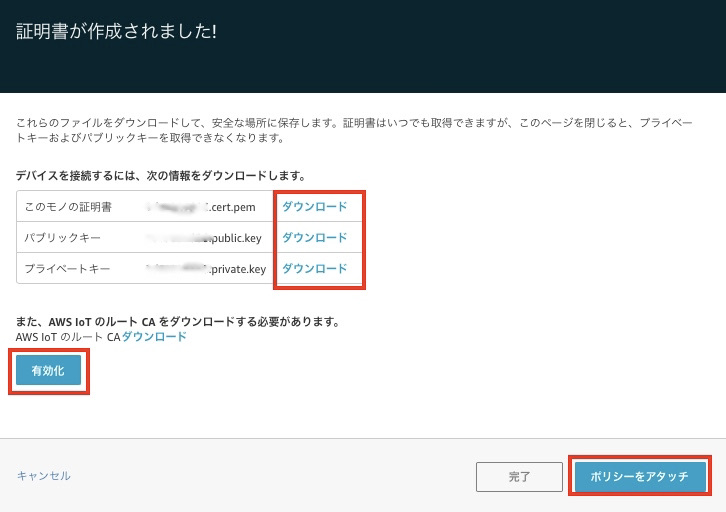
証明書、キーが発行されますので、ダウンロードしておきます。この証明書は、RaspberryPiにコピーして使用します。
ルートCAファイルは、別途RaspberryPiからダウンロードするため、ここではダウンロードはしません。
証明書、キーファイルのダウンロード完了後に「 有効化 」ボタンをクリックし、証明書を有効にします。
最後に「 ポリシーをアタッチ 」ボタンをクリックします。
最初に作成した「 ポリシー 」を選択し、「 モノの登録 」ボタンをクリックします。
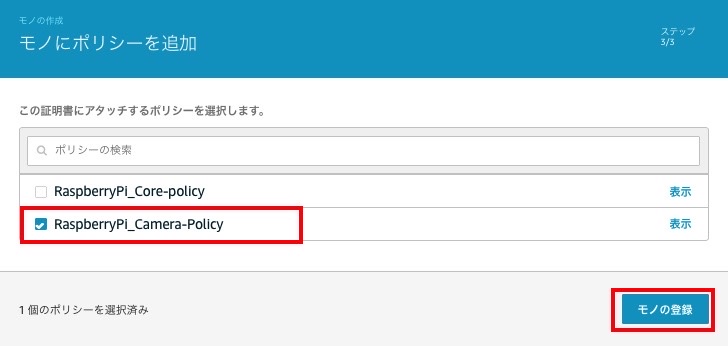
以上で IoT CoreにIoT Deviceの登録が完了しました。
次はIoT Device(Raspberry Pi)で動作する、IoT Device Shadowのプログラムです。
ルートCAファイルのダウンロード
Raspberry PiにSSH接続してログインします。
$ ssh pi@192.168.10.10
保存するディレクトに移動し、ルートCAファイルダウンロードします。
   $ cd  /home/pi/Documents/testShadow/cert
   $ sudo wget -O root.ca.pem https://www.amazontrust.com/repository/AmazonRootCA1.pem
Raspberry Pi環境
certディレクトリ配下にはルートCA、証明書、キー情報ファイルを配置しますので、 本記事箇所でダウンロードした証明書、キー情報ファイルはコピーしてください。
imageディレクトリは、カメラ起動中にキャプチャした画像を保存する場所です。
 testShadow/
       |
       |--- shadow_camera_test.py
       |
       |--- cert/
       |           |--- root.ca.pem                      #  ルートファイル
       |           |--- xxxxxxxxxxx.cert.pem"      #証明書ファイル
       |           |--- xxxxxxxxxxx.private.key"   #privateキーファイル
       |
       |--- image/
ソースコード
「OpenCV」、「AWSIoTPythonSDK.MQTTLib」はインストールしておいてください。
ソースコードは、「AWSIoTPythonSDK」の「sample」ディレクトリにあるソースファイルを参考にしました。
AWSIoTPythonSDK
updateState()、customShadowCallback_Delta()、54行目〜77行目も一部変更していますが、ほぼ流用です。
カメラ起動中は1秒周期でキャプチャーした画像を保存します。
ソースコード内の「 ■ 」コメントがある箇所は自分の環境に合わせて修正してください。
from AWSIoTPythonSDK.MQTTLib import AWSIoTMQTTShadowClient
import logging
import time
import json
import argparse
import cv2
import datetime

# VideoCapture用インスタンス生成
cap = cv2.VideoCapture(0)
# バッファサイズ1に変更
cap.set(cv2.CAP_PROP_BUFFERSIZE, 1)

# カメラ状態保存処理
def cameraStatusSet(onoff):
    global cameraState
    # カメラ起動指示有無確認
    if onoff == "1" :
        cameraState = 'on'
    else:
        cameraState = 'off'

# IoT Device Shadow "reported" UpDate処理
def updateState(newState):
    JSONPayload = '{"state":{"reported":{"camera":' + str(newState) +'}}}'
    print("updating...\n")
    print(JSONPayload)
    deviceShadowHandler.shadowUpdate(JSONPayload, None, 5)
    cameraStatusSet(newState)

# Custom Shadow callback
def customShadowCallback_Delta(payload, responseStatus, token):
    print(responseStatus)
    payloadDict = json.loads(payload)
    print("++++++++DELTA++++++++++")
    print("camera: " + str(payloadDict["state"]["camera"]))
    print("version: " + str(payloadDict["version"]))
    print("+++++++++++++++++++++++\n\n")

    # reported Update
    newState = json.dumps(payloadDict["state"]["camera"])
    updateState(newState)


host = "xxxxxxxxxxxxxxxx-ats.iot.ap-northeast-1.amazonaws.com"   # ■自環境に合わせて設定
port = 8883  # MQTT
clientId = "RaspberryPi"   # ■ ClientidはthingNameと同じにするとIoT Coreの
                                       # ■ shadow変換が見えなくなるので、違う名前にした
thingName = "RaspberryPi_Camera"# ■AWS IoT Coreで「モノの作成」で生成した名前
rootCAPath = "./cert/root.ca.pem"
certificatePath = "./cert/xxxxxxxxxxxx-certificate.pem.crt" # ■ 自環境に合わせて設定
privateKeyPath = "./cert/xxxxxxxxxxxx-private.pem.key"       # ■ 自環境に合わせて設定

# Configure logging
logger = logging.getLogger("AWSIoTPythonSDK.core")
logger.setLevel(logging.DEBUG)
streamHandler = logging.StreamHandler()
formatter = logging.Formatter('%(asctime)s - %(name)s - %(levelname)s - %(message)s')
streamHandler.setFormatter(formatter)
logger.addHandler(streamHandler)

# Init AWSIoTMQTTShadowClient
myAWSIoTMQTTShadowClient = AWSIoTMQTTShadowClient(clientId)
myAWSIoTMQTTShadowClient.configureEndpoint(host, port)
myAWSIoTMQTTShadowClient.configureCredentials(rootCAPath, privateKeyPath, certificatePath)

# AWSIoTMQTTShadowClient configuration
myAWSIoTMQTTShadowClient.configureAutoReconnectBackoffTime(1, 32, 20)
myAWSIoTMQTTShadowClient.configureConnectDisconnectTimeout(10)  # 10 sec
myAWSIoTMQTTShadowClient.configureMQTTOperationTimeout(5)  # 5 sec

# Connect to AWS IoT
myAWSIoTMQTTShadowClient.connect()
# Create a deviceShadow with persistent subscription
deviceShadowHandler = myAWSIoTMQTTShadowClient.createShadowHandlerWithName(thingName, True)
# Listen on deltas
deviceShadowHandler.shadowRegisterDeltaCallback(customShadowCallback_Delta)

# カメラON/OFF状態を初期化
cameraState = 'off'

# Loop forever
while True:
    # カメラOPEN状態
    while(cap.isOpened()):
        # カメラ起動状態指示 ?
        if cameraState == 'on':
            # カメラで顔データを取得する
            ret, img = cap.read()
            # 日時取得
            dt_now = datetime.datetime.now()
            dateStr = dt_now.strftime('%Y%m%d_%H%M%S_%f')
            dateStr1 = dt_now.strftime('%Y/%m/%d %H:%M:%S')
            # 画像内に日時を書き込み
            cv2.putText(img, dateStr1 ,(20,450), cv2.FONT_HERSHEY_SIMPLEX, 0.5, (0,255,0), 1, cv2.LINE_AA)
            # 画像ファイル保存
            cv2.imwrite('./image/image_'+ dateStr + '.jpg',img)
        time.sleep(1)
IoT Device shadow起動
$ python3 shadow_camera_test.py
起動すると、標準出力で表示ログを出力します。
下記の表示イメージは、全て「AWSIoTPythonSDK.MQTTLib」ライブラリで出力しています。
  2020-12-17 10:01:55,642 - AWSIoTPythonSDK.core.protocol.internal.clients - DEBUG - Initializing MQTT layer...
  2020-12-17 10:01:55,644 - AWSIoTPythonSDK.core.protocol.internal.clients - DEBUG - Registering internal event callbacks to MQTT layer...
  2020-12-17 10:01:55,644 - AWSIoTPythonSDK.core.protocol.mqtt_core - INFO - MqttCore initialized
  2020-12-17 10:01:55,645 - AWSIoTPythonSDK.core.protocol.mqtt_core - INFO - Client id: RaspberryPi
  2020-12-17 10:01:55,645 - AWSIoTPythonSDK.core.protocol.mqtt_core - INFO - Protocol version: MQTTv3.1.1
  2020-12-17 10:01:55,645 - AWSIoTPythonSDK.core.protocol.mqtt_core - INFO - Authentication type: TLSv1.2 certificate based Mutual Auth.
  2020-12-17 10:01:55,645 - AWSIoTPythonSDK.core.protocol.mqtt_core - INFO - Configuring offline requests queueing: max queue size: 0
  2020-12-17 10:01:55,646 - AWSIoTPythonSDK.core.protocol.mqtt_core - INFO - Configuring offline requests queue draining interval: 0.100000 sec
  2020-12-17 10:01:55,646 - AWSIoTPythonSDK.core.protocol.mqtt_core - INFO - Configuring endpoint...
  2020-12-17 10:01:55,647 - AWSIoTPythonSDK.core.protocol.mqtt_core - INFO - Configuring certificates...
  2020-12-17 10:01:55,647 - AWSIoTPythonSDK.core.protocol.mqtt_core - INFO - Configuring reconnect back off timing...
  2020-12-17 10:01:55,648 - AWSIoTPythonSDK.core.protocol.mqtt_core - INFO - Base quiet time: 1.000000 sec
  2020-12-17 10:01:55,648 - AWSIoTPythonSDK.core.protocol.mqtt_core - INFO - Max quiet time: 32.000000 sec
  2020-12-17 10:01:55,648 - AWSIoTPythonSDK.core.protocol.mqtt_core - INFO - Stable connection time: 20.000000 sec
  2020-12-17 10:01:55,649 - AWSIoTPythonSDK.core.protocol.mqtt_core - INFO - Configuring connect/disconnect time out: 10.000000 sec
  2020-12-17 10:01:55,649 - AWSIoTPythonSDK.core.protocol.mqtt_core - INFO - Configuring MQTT operation time out: 5.000000 sec
  2020-12-17 10:01:55,649 - AWSIoTPythonSDK.core.protocol.mqtt_core - INFO - Performing sync connect...
  2020-12-17 10:01:55,649 - AWSIoTPythonSDK.core.protocol.mqtt_core - INFO - Performing async connect...
  2020-12-17 10:01:55,649 - AWSIoTPythonSDK.core.protocol.mqtt_core - INFO - Keep-alive: 600.000000 sec
  2020-12-17 10:01:55,650 - AWSIoTPythonSDK.core.protocol.internal.workers - DEBUG - Event consuming thread started
  2020-12-17 10:01:55,651 - AWSIoTPythonSDK.core.protocol.mqtt_core - DEBUG - Passing in general notification callbacks to internal client...
  2020-12-17 10:01:55,651 - AWSIoTPythonSDK.core.protocol.internal.clients - DEBUG - Filling in fixed event callbacks: CONNACK,DISCONNECT,MESSAGE
  2020-12-17 10:01:55,774 - AWSIoTPythonSDK.core.protocol.internal.clients - DEBUG - Starting network I/O thread...
  2020-12-17 10:01:55,848 - AWSIoTPythonSDK.core.protocol.internal.workers - DEBUG - Produced [connack] event
  2020-12-17 10:01:55,849 - AWSIoTPythonSDK.core.protocol.internal.workers - DEBUG - Dispatching [connack] event
  2020-12-17 10:01:55,850 - AWSIoTPythonSDK.core.protocol.internal.workers - DEBUG - No need for recovery
  2020-12-17 10:01:55,851 - AWSIoTPythonSDK.core.protocol.internal.clients - DEBUG - Invoking custom event callback...
  2020-12-17 10:01:55,852 - AWSIoTPythonSDK.core.protocol.mqtt_core - INFO - Performing sync subscribe...
  2020-12-17 10:01:55,852 - AWSIoTPythonSDK.core.protocol.internal.workers - DEBUG - Adding a new subscription record:$aws/things/RaspberryPi_Camera/shadow/update/delta qos: 0
  2020-12-17 10:01:55,853 - AWSIoTPythonSDK.core.protocol.internal.clients - DEBUG - Filling in custom suback event callback...
  2020-12-17 10:01:55,907 - AWSIoTPythonSDK.core.protocol.internal.workers - DEBUG - Produced [suback] event
  2020-12-17 10:01:55,908 - AWSIoTPythonSDK.core.protocol.internal.workers - DEBUG - Dispatching [suback] event
  2020-12-17 10:01:55,908 - AWSIoTPythonSDK.core.protocol.internal.clients - DEBUG - Invoking custom event callback...
  2020-12-17 10:01:55,909 - AWSIoTPythonSDK.core.protocol.internal.clients - DEBUG - This custom event callback is for pub/sub/unsub, removing itafter invocation...
  2020-12-17 10:01:57,912 - AWSIoTPythonSDK.core.shadow.deviceShadow - INFO - Subscribed to delta topic for deviceShadow:RaspberryPi_Camera
  2020-12-17 10:02:01,042 - AWSIoTPythonSDK.core.protocol.internal.workers - DEBUG - Produced [message] event
  2020-12-17 10:02:01,042 - AWSIoTPythonSDK.core.protocol.internal.workers - DEBUG - Dispatching [message] eventdelta/RaspberryPi_Camera
参考までに、shadow差分を検知すると以下の画面ログが出力されます。
  ++++++++DELTA++++++++++
  camera: 1
  version: 12
  +++++++++++++++++++++++

updating...
AWSとIoT Deviceの設定が全て終わりました。
遠隔から指示する場合、iphoneだけではなくPCからも制御可能です。 コマンドイメージはPart4の方で。